
Tuesday 28 February 2012
The Last of the Spicy Tomato Soup
That's it today for lunch I ate my last batch of the Spicy Tomato Soup I made, with last years home grown tomatoes. Luckily, I've recently sown all my summer seeds including three varieties of Tomato, so all's I have to do now is wait for them to grow, so I can make more.
Photo: Laura Lunt Date: February 2012
Friday 17 February 2012
The First Sow Of The Year
Over the recent snowy weekend, I started to sow my first batch of seeds of the year, which I always start at this time of the year (mid February). Having already sorted through all the seeds I've managed to collect, earlier in the month, I then got to prepping for this years vegetable sowing.
 Photo: Laura Lunt Date: February 2012
Tools
6cm Pots
Compost (peat free)
Spoon
Watering Can
Newspaper
Label Sticks / Pen
Seed Trays
As I only have a small balcony, seed sowing for me, usually happens on my dinning room table, which is covered with newspaper. Having selected the types of vegetables I wanted to grow (see picture & list below), I would have normally sown these into my propagator, into individual pods, but this year I have decided to sow the seeds into small 6cm pots, as I have a lot of different vegetables I'd like to sow.
I filled each pot with peat free compost, leaving a 1.5cm gap from the top, watered them and then added 5-7 seeds to each separate pot, making sure I added a label stick so I knew what was in each pot. A small layer of compost was then laid on top of the seeds and these were then placed into a seed tray. After all the seeds were sown, and they had been carefully placed in seed trays and then placed on a south-east facing windowsill, around 2cms of water was added to the trays, and has been carefully topped up when needed.
 Photo: Laura Lunt Date: February 2012
Vegetable Seeds
Tomatoes (x3 varieties) - Moneymaker / Gardeners Delight and Roma VF (Plum)
Chilies (x5 varieties) - Thai Dragon / Inferno / Tabasco / Pepper (Hot) Hotscotch and Pepper Cayenne
Peppers (sweet)
Parsnip Duchess F1
Brussels Sprout Evesham Special
Sweet Pea (Old Spice Mixed)
Aubergines Black Beauty Organic
Herb Seeds
Chives
Basil Sweet Genovese
Dill
I haven't covered these with any form of lid, as I'd like to see how they do without this, and as they are in the sunniest part of the flat, over a radiator, I'm sure it won't harm them. In fact, its now been a week since these have been sown and I already have Sprout and Sweet Pea seedlings appearing.
 Photo: Laura Lunt Date: February 2012
The herb seeds were sown into re-useable herb pots, which my boyfriend bought last year. The pots were put through the dishwasher, before being used again. As with the vegetable seeds these were also filled with peat free compost, watered, seeds added and then filled with more compost, and then watered again.
 Photo: Laura Lunt Date: February
Now everything is happily sitting on the windowsill and I just have to wait for even more little seedlings to appear over the coming weeks and the sun to come out.

Tools
6cm Pots
Compost (peat free)
Spoon
Watering Can
Newspaper
Label Sticks / Pen
Seed Trays
As I only have a small balcony, seed sowing for me, usually happens on my dinning room table, which is covered with newspaper. Having selected the types of vegetables I wanted to grow (see picture & list below), I would have normally sown these into my propagator, into individual pods, but this year I have decided to sow the seeds into small 6cm pots, as I have a lot of different vegetables I'd like to sow.
I filled each pot with peat free compost, leaving a 1.5cm gap from the top, watered them and then added 5-7 seeds to each separate pot, making sure I added a label stick so I knew what was in each pot. A small layer of compost was then laid on top of the seeds and these were then placed into a seed tray. After all the seeds were sown, and they had been carefully placed in seed trays and then placed on a south-east facing windowsill, around 2cms of water was added to the trays, and has been carefully topped up when needed.

Vegetable Seeds
Tomatoes (x3 varieties) - Moneymaker / Gardeners Delight and Roma VF (Plum)
Chilies (x5 varieties) - Thai Dragon / Inferno / Tabasco / Pepper (Hot) Hotscotch and Pepper Cayenne
Peppers (sweet)
Parsnip Duchess F1
Brussels Sprout Evesham Special
Sweet Pea (Old Spice Mixed)
Aubergines Black Beauty Organic
Herb Seeds
Chives
Basil Sweet Genovese
Dill
I haven't covered these with any form of lid, as I'd like to see how they do without this, and as they are in the sunniest part of the flat, over a radiator, I'm sure it won't harm them. In fact, its now been a week since these have been sown and I already have Sprout and Sweet Pea seedlings appearing.

The herb seeds were sown into re-useable herb pots, which my boyfriend bought last year. The pots were put through the dishwasher, before being used again. As with the vegetable seeds these were also filled with peat free compost, watered, seeds added and then filled with more compost, and then watered again.

Now everything is happily sitting on the windowsill and I just have to wait for even more little seedlings to appear over the coming weeks and the sun to come out.
Friday 10 February 2012
Chili & Pepper (Sweet) - Mystery Seeds?
It seems though I thought I'd be doing a great thing by saving my Chili and Pepper (sweet) seeds, it has been pointed out me to that these may not be exactly true to type, when it comes to sowing them. Some very good advice from a fellow UK Veg Garderners gardener has let me know that as a rule of thumb, different varieties of Chilies and Peppers (sweet) should either be planted at least four miles apart or they should be grown under insect proof nets, for the plants to produce seeds true to type.
I've planted my 'so called' Chili and Pepper (sweet) seeds under their original names but it seems, I may actually end up with very different varieties such as 'Thai Tabasco' or 'Inferno Dragon' and maybe even a not so cool Pepper (sweet).
I'm very excited about this, as I had no idea about the possibility of it happening, but everything is now planted and all's I have to do is just wait and see.
Friday 3 February 2012
Preserves: Roasted Tomato Passata
Last year I grew a lot of Tomatoes, so I decided to create some Tomato Passata. I've never done this before, so after some research on the internet, including watching a few cooking demo videos, I decided to use the recipe from the book 'Preserves: River Cottage Handbook No2', which I'd recently bought.
This Roasted Tomato Passata recipe makes 2x 500ml Jars:
2kg Ripe Tomatoes
200g Shallots, peeled and thinly sliced
3-4 Garlic Cloves, peeled and thinly sliced
A few Rosemary, Thyme, Basil or Oregano sprigs
1tsp Salt
1/2 tsp Ground Black Pepper
1tsp Sugar
50ml Olive, Sunflower or Rapeseed Oil
Pre-heat oven to 180c / gas mark 4
Firstly cut all the tomatoes in half, place them cut side up in a single layer in a large pot. Then scatter the shallots, garlic, herbs, salt, pepper, sugar and oil. This then needs to be roasted for 1 hour or until everything is well softened. Remove the pot from the oven and rub the entire content through a nylon slieve or puree with a passata machine or mouli.
 Photo: Laura Lunt Date: September 2011
Make sure you have the hot sterilised jars ready, put the tomato puree into a sauce pan and bring it to a boil, once its boiled pour into the jars, filling them to the brim and seal, depending on the jars.
Stand the jars in a large pan with a towel at the bottom and over everything with warm water, bring to a simmering point (which is 88c) over a period of 25 minutes, using a thermometer will help here and then simmer for 10 minutes.
 Photo: Laura Lunt Date: September 2011
After simmering, remove the jars from the pan and stand them on a wooden surface or folded towel. Leave undisturbed until cold, then check the seal. These can be stored and used within 12 months. Once opened, refrigerate and use within a few days.
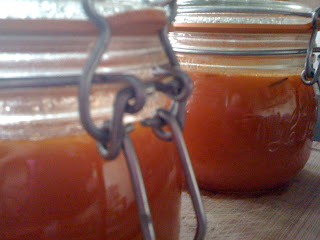 Photo: Laura Lunt Date: September 2011
This Roasted Tomato Passata recipe makes 2x 500ml Jars:
2kg Ripe Tomatoes
200g Shallots, peeled and thinly sliced
3-4 Garlic Cloves, peeled and thinly sliced
A few Rosemary, Thyme, Basil or Oregano sprigs
1tsp Salt
1/2 tsp Ground Black Pepper
1tsp Sugar
50ml Olive, Sunflower or Rapeseed Oil
Pre-heat oven to 180c / gas mark 4
Firstly cut all the tomatoes in half, place them cut side up in a single layer in a large pot. Then scatter the shallots, garlic, herbs, salt, pepper, sugar and oil. This then needs to be roasted for 1 hour or until everything is well softened. Remove the pot from the oven and rub the entire content through a nylon slieve or puree with a passata machine or mouli.

Make sure you have the hot sterilised jars ready, put the tomato puree into a sauce pan and bring it to a boil, once its boiled pour into the jars, filling them to the brim and seal, depending on the jars.
Stand the jars in a large pan with a towel at the bottom and over everything with warm water, bring to a simmering point (which is 88c) over a period of 25 minutes, using a thermometer will help here and then simmer for 10 minutes.

After simmering, remove the jars from the pan and stand them on a wooden surface or folded towel. Leave undisturbed until cold, then check the seal. These can be stored and used within 12 months. Once opened, refrigerate and use within a few days.

Wednesday 1 February 2012
Collecting Chili & Pepper Seeds
In a bid to save on buying seeds or new plants, this year I've tried to save some seeds from a few plants I've grown. I've specifically planned to save those from my different Chili varieties and Pepper (Sweet) plants:
Thai Dragon Chili Seeds
Tabasco Seeds
Inferno Seeds
Pepper (sweet) Seeds
Saving these was very easy, for the Pepper (Sweet) when going to cooking these; I saved as many seeds as possible from inside the Pepper, placed them in a small open bowl, left them in a light but not sunny area and waited for them to dry out naturally. The same was done for the Chilies, but I did allow some of the Chilies to dry out naturally before de-seeding.
Drying out took a few days to a week, and they should stay the same natural light colour as they were inside the vegetable, I have done this before and by mistake placed in direct sun, to which the seeds burned and turned a dark brown colour, not good. Also, it is handy to label the bowls, I forgot to do this and ended up having to lick a seed to see if it was a Pepper or Chili seed, turned out to be Chili and it was very hot.
 Photo: Laura Lunt Date: January 2012
I now have a lot of seeds collected and some will be sown for this year, which I should hopefully to doing very soon. For the rest, I've decided to create a little seed collection gift pack, which I'll be sending out to a few family members and friends, and hope they have fun growing them this year along with me.
Thai Dragon Chili Seeds
Tabasco Seeds
Inferno Seeds
Pepper (sweet) Seeds
Saving these was very easy, for the Pepper (Sweet) when going to cooking these; I saved as many seeds as possible from inside the Pepper, placed them in a small open bowl, left them in a light but not sunny area and waited for them to dry out naturally. The same was done for the Chilies, but I did allow some of the Chilies to dry out naturally before de-seeding.
Drying out took a few days to a week, and they should stay the same natural light colour as they were inside the vegetable, I have done this before and by mistake placed in direct sun, to which the seeds burned and turned a dark brown colour, not good. Also, it is handy to label the bowls, I forgot to do this and ended up having to lick a seed to see if it was a Pepper or Chili seed, turned out to be Chili and it was very hot.

I now have a lot of seeds collected and some will be sown for this year, which I should hopefully to doing very soon. For the rest, I've decided to create a little seed collection gift pack, which I'll be sending out to a few family members and friends, and hope they have fun growing them this year along with me.
Subscribe to:
Posts (Atom)